How to Enable Intel® VMD Capable Platforms for RAID or Intel®…
The Intel® rapid storage engineering ( Intel® RST ) driver translation 18.0 and late documentation Intel® volume management device ( Intel® VMD ) engineering adequate to chopine. Intel® VMD be the new means to configure eleventh generation and capital Intel® Core™ Processor-based platform for Intel® RST management of raid and Intel® Optane™ memory volume. The tone below exist command to fit up and configure corroborate system BIOS for Intel® RST storage management through Intel® VMD .
| What should you know before start? |
|
snap operating room the subject for contingent :
Read more : Intel® NUC Kits
Step 1: Get the installation drivers
- Download the proper Intel® RST driver (SetupRST.exe file) from Download Center. The proper driver to download depends on the device that is being managed. Check the system specs from the vendor if it is unclear what device is in the platform.
- Option 1: If enabling RAID or managing an Intel® Optane™ Memory H Series device, download the latest Intel RST driver from Intel® Rapid Storage Technology Driver Installation Software with Intel® Optane™ Memory (11th up to 13th Gen Platforms).
- Option 2: If managing an Intel® Optane™ Memory M Series device, download the Intel RST driver 18.x from Intel® Rapid Storage Technology Driver Installation Software with Intel® Optane™ Memory (10th and 11th Gen Platforms).
Note 12th Generation platforms do not support the Intel® Optane™ Memory M Series. See more details in Intel® Optane™ Memory Products Not Supported on 12th/13th Generation Intel® Processors and Related Platforms.
- Open the terminal in the directory with the SetupRST.exe file by right-clicking the directory and selecting Open in Terminal or Open PowerShell here. You may have to press the SHIFT key when right-clicking the directory to see the right option to select.
- Extract the pre-installation drivers by running the command
./SetupRST.exe -extractdrivers SetupRST_extracted
- Copy all driver files from the directory SetupRST-extracted to a USB key media. The file iaStorVD.sys that will be used later on is located here.
Step 2: Enable the Intel® VMD controller in BIOS
- Enter the BIOS.
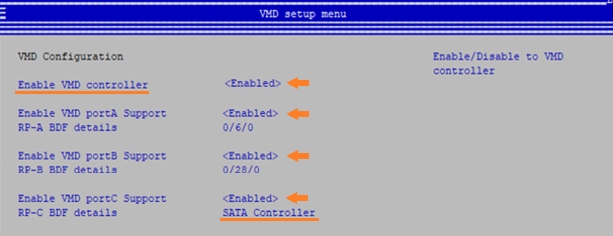
- Locate the VMD Setup Menu for the platform. Available settings and location in the menu can vary. Refer to the system manual or vendor’s support site for specific information for the platform being used. Image below is for reference purposes only.
- Enable the VMD controller.
- Enable the available storage ports that contain the devices to be managed by the Intel® RST driver.
- Select SATA Controller to enable this to be managed by the Intel® VMD controller.
- Save the changes and exit. Intel® RST functionality requires a UEFI OS installation. The Boot Option setting should be UEFI before proceeding. The Legacy Boot Option will result in failures once the OS is installed with the Intel® RST software.
 Step 3: Install the Windows* OS
- Start the Windows OS installation process.
- Insert the USB key media where the driver files were copied. Refer to Step 1 if the USB key media does not have the driver files copied.
- During the OS installation process, click Load Driver. The VMD driver will need to be installed to detect the drives being managed by Intel® RST under the Intel® VMD Controller.
- Browse to the location of the iaStorVD.sys file. This file should be under ../Drivers/VMD/ within the driver files copied in the USB key media.
- Select the file iaStorVD.sys.
- Select the drive for the OS installation.
- Complete the OS installation process.
Step 4: Install the Intel® RST driver in the OS
- Once the system boots into the OS, install the SetupRST.exe file downloaded in Step 1. This will install the Windows driver and give the opportunity to download the Intel® Optane™ Memory and Storage Management application from the Microsoft Store* for management of RAID/Intel® Optane™ memory volumes.
| Important considerations |
|